
| How to rotate a bitmap | Comment faire tourner un bitmap d'un certain angle |
| 1. Rotating a bitmap with an angle of 90° | Faire tourner un bitmap d'un angle de 90° |
| We
are using the Pixels property of
a canvas to do the job. This is really straight forward. With a rotation angle of 90°, the Width of the destination bitmap becomes the Height of the source and the Height of the destination bitmap, becomes the Width of the source. Once these properties are set, we rotate each pixel one at a time. This is easy but terribly slow for large bitmap. |
Pour
effectuer une rotation de 180°, on utilise la
propriété Pixels d'un canevas. Cette
méthode est
très simple mais très lente avec des bitmaps de
taille
importante. Dans une rotation de 90°, la propriété Width du bitmap de destination est égale à la propriété Height du bitmap source et vice versa. Lorsqu'on a défini ces deux propriétés du bitmap de destination, tout ce qui reste à faire est d'effectuer la rotation un pixel à la fois. |
|
//Open the source and create the destination bitmap |
| 2. Rotating a bitmap with an angle of 180° | Faire tourner un bitmap d'un angle de 180° |
| The method is the same as the one used to rotate a bitmap with an angle of 90°. The only difference is that the width and Height of the destination bitamp are the same as the source bitmap. | La méthode est la même que pour une rotation de 90°. La seule différence est que les propriétés Width et Height du bitmap de destination sont égales à celles du bitmap source. |
|
//Open the source and create the destination bitmap |
| 3. Rotating a bitmap with an angle of any value | Faire tourner un bitmap d'un angle quelconque |
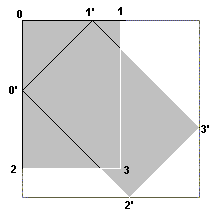
| The
method is more complex. We need
some trigonometrical knowledges to do the job. Take a look at the figure shown below : The points 0 to 3 are the coordinates of the source bitmap and the points 0' to 3' are the coordinates of the rotated bitmap. Point 0 is the origin (0,0) of the source bitmap. The point 1 is the point (0,bitmap->Width) , the point 2 is the point (bitmap->Height,0) and the point 3 is the point (bitmap->Width,bitmap->Height). In this example, the rotation angle is equal to 45° so the coordinates become points 0' to 3' and the bounding rectangle of the rotated bitmap is quite larger than the source bitmap. |
Faire
tourner un bitmap d'un angle quelconque est plus compliqué.
Il
faudra utiliser quelques formules trigonométriques pour y
arriver. Examinons la figure ci dessous : Les points 0 à 3 représentent les coordonnées du bitmap source. Le point 0 correspond à l'origine (0,0). Le point 1 correspond au point de coordonnées (0, bitmap->Width), le point 2 au point de coordonnées (bitmap->Height,0) et le point 3 au point de coordonnées (bitmap->Width,bitamp->Height). On remarquera que la taille du rectangle dans lequel le bitmap est inscrit après rotation est plus grande que la taille du bitmap source. |
| To find the width and height of the bounding rectangle which correspond to the width and height of the destination bitmap, whe have to use the following formulas : | La taille du bitmap de destination correspond a la taille du rectangle dans lequel le bitmap, après rotation, est inscrit. Pour trouver cette taille, on utilise les formules suivantes : |
newx=x*cos(angle)+y*sin(angle)
newy=y*cos(angle)-x*sin(angle)
| The math functions in C++ expect a value in radians so we have to convert degrees to radians with the formula : | Les fonctions sin et cos nécessitent que l'angle soit exprimer en radians. On utilisera donc la formule suivante pour effectuer la conversion degré / radian: |
radian=(2*pi*degree)/360
| For
each point 0 to 3, we calculate
the coordinates of the new points 0' to 3'. The width of the bounding
rectangle is equal to the maximum value of x (for the points
0'
to 3') minus the minimum value of x. The height is equal to the maximum
value of y minus the minimum value of y.
For example, if the bitmap has a width of 100 pixels, a height of 226 pixels and if we want to perform a rotation of 45° : |
Pour
chaque point 0 à 3, on calcule les nouveaux points 0'
à
3'. La propriété Width du bitmap de destination
est alors
égale à la valeur maximale de x moins la valeur
minimale
de x. De même, la propriété Height est
égale
à la valeur maximale de y moins la valeur minimale de y.
Prenons un exemple. Soit un bitmap source de dimansion 100 * 226 et un angle de rotation de 45°: |
point 0 (0,0) --> point 0' (0,0)
point 1 (100,0) --> point 1' (70.7,70.7)
point 2 (0,226) --> point 2' (159.7,159.7)
point 3 (100,226) --> point 3' (230.4,89)
| The width of the destination bitmap (= bounding rectangle) is equal to 230 (230.4 - 0) (rounded). The height : 230 (159.7 - -70.7). | La taille du bitmap de destination est alors égale à 230 * 230(230.4 - 0)et (159.7 - -70.7) après arrondi. |
|
int angle=45; //45° for example |
| Now, the easy part, we take each pixel in the destination bitmap and get its value in the source bitmap using the same formulas. You would expect to get the value in the source bitmap and then to copy it to the destination bitmap but doing this, it leaves holes in the destination bitmap. It's because each point in the source bitmap doesn't have an equivalent in the destination bitmap. | Maintenant, la partie la plus facile. On prend chaque pixel dans le bitmap de destination et on calcule à l'aide des même formules à quelle valeur correspond le pixel dans le bitmap source. Cette fçon de procéder évite les trous qui apparaissent dans le bitmap destination si on fait l'inverse : prendre chaque pixel dans la bitmap source et le copier dans le bitmap destination. Ces trous sont dû au fait que chaque pixel dans le source n'a pas nécessairement d'équivalent dans le bitmap de destination. |
|
for(int x=0;x<DestBitmapWidth;x++) |
| Note : The min() and max() found in the code above are defines found in the windows API. If you don't want to include windows.h in your project, just redefine these macros yourself : | Note : Les fonctions min() et max() utilisées dans le code ci-dessus sont en fait des macros définies dans l'API Windows. Si vous ne désirez pas inclure windows.h dans votre projet, vous pouvez redéfinir ces macros vous même : |
|
#define min(a, b) (((a) < (b)) ? (a) : (b)) |
| 4. Rotating using NT functions | Rotation en utilisant les fonctions NT |
| There
are some functions only
available under Windows NT. They are really fast even with large
bitmaps. The code uses the function SetWorldTransform(), the BitBlt()
function and the XFORM structure. SetWorldTransform() is NOT
available under windows 95/98. You have to compute the Width and Height of the destination bitmap as shown at point 3. and then add the code below. |
Sous
NT, il existe une fonction SetWorldTransform(), en combinaison avec
BitBlt() et la structure XFORM, qui permet d'effectuer une rotation de
façon rapide même avec des bitmaps de grande
taille. La
fonction SetWorldTransform n'est PAS disponible sous windows 95/98.
Vous devez calculez d'abord la taille du bitmap de destination comme indiqué plus haut (point 3.) et ajouter le code ci-dessous : |
|
SetGraphicsMode(DestBitmap->Canvas->Handle,GM_ADVANCED); |
| 5. Rotating bitmaps using DIBs | Rotation en convertissant les bitmaps en DIBs |
| To
rotate bitmap faster, you can
convert your bitmap to a device independent bitmap (DIB), create a
destination DIB to hold the rotated bitmap and then, convert the
destination DIB to a device dependent bitmap. Using this technique is, on my computer, seven times faster than using the Pixel property of a bitmap. |
A
part la méthode utilisée pour NT, les autres
méthodes de rotation sont lentes. Pour améliorer
la
vitesse de rotation, on peut envisager de convertir le bitmap source en
un device independent bitmap (DIB), créer un DIB
destiné
à contenir le bitmap après rotation et ensuite
convertir
ce DIB en bitmap que l'on peut afficher facilement. Sur mon PC, cette technique est sept fois plus rapide que lorsqu'on utilise la propriété Pixel du bitmap. |
|
//Source Bitmap |
| This sample is only usable with 24 or 32-bit bitmaps. Besides, I have only checked the code with 24-bit bitmaps because I don't have a 32-bit bitmap at hand. | Cet exemple n'est utilisable tel quel qu'avec des bitmaps 24 ou 32-bit. De plus, je n'ai pas testé le code avec un bitmap 32-bit pour la simple raison que je n'en ai pas et que je n'ai pas de programme de dessin me permettant d'en créer un. |
| 6. Rotating bitmaps using GDI+ | Utilisation de GDI+ pour effectuer une rotation |
| GDI+
is the new API from Microsoft
intended to replace the old GDI. GDI+ is included in XP natively and
can be used in 98/ME/NT/2K if the proper DLL is installed. It simplifies things greatly. The first sample below, performs a 90-degrees rotation and then a vertical flip. The second sample rotates the image by 45-degrees. Note: Read the article GDI+ and C++ Builder to know how to install, initialize and use GDI+. |
GDI+
est la nouvelle API de Microsoft destinée à
remplacer
GDI. Elle fait déjà partie de XP et peut
être
utilisée avec 98/ME/NT/2k à condition d'installer
la DLL
adéquate. GDI+ simplifie énormément les choses dans le cas de rotations. Le premier exemple, ci dessous, effectue une rotation de 90° et un renversement vertical. Le second exemple réalise une rotation de 45°. Note: Lisez l'article GDI+ et C++ Builder pour apprendre comment installer, initialiser et utiliser GDI+. |
|
Gdiplus::Graphics graphics(hdc); |
Acknowledgment
| Some of the code samples given in this article are based on a Microsoft knowledge base document (Q77127) from the Win32sdk and on an article written by Zafir Anjum for www.codeguru.com. | Certains des exemples donnés dans cet article sont librement inspirés d'un document Microsoft (Q77127) du Win32sdk et sur un article écrit par Zafir Anjum pour www.codeguru.com. |